Table of Contents
As you likely know, links and ads play a pivotal role in affiliate marketing. Your job as the program manager is to ensure that each affiliate gets their own personalized URLs. However, this can be a tedious, time-consuming task.
Fortunately, Easy Affiliate makes it possible to create personalized URLs for links and banners with just a few clicks. Once created, these individualized URLs can be immediately used by your affiliates to promote your products and make sales (while also tracking each affiliate’s progress).
In this post, we’ll introduce you to the Creatives feature available within Easy Affiliate. We’ll show you how to create unique links and banner ads for each of your affiliates, along with two tips for sharing them most effectively. Let’s get started!
An Introduction to Easy Affiliate’s Links and Banners Creatives Feature
The Links and Banners Creatives feature enables you to create text and image ads within the Easy Affiliate dashboard. Your affiliates can then use them in their own marketing efforts.
As an affiliate program manager, you can also benefit from this feature. For example, the Creatives feature:
- Makes creating personalized links and banner ads for each affiliate simple – simply upload the ads or create the links and let Easy Affiliate do the rest!
- Saves you time that can be spent elsewhere on your program.
The feature is just one way that Easy Affiliate makes managing and running your program easy. In fact, it’s perhaps one of the most helpful (and financially beneficial) features offered by the plugin.
How to Create Links and Banner Ads for Your Affiliates Using Easy Affiliate

Easy Affiliate is an affiliate program management tool with an array of features on hand. One such tool, the Creatives tab, enables you to effortlessly create affiliate-specific links and banner ads for your program.
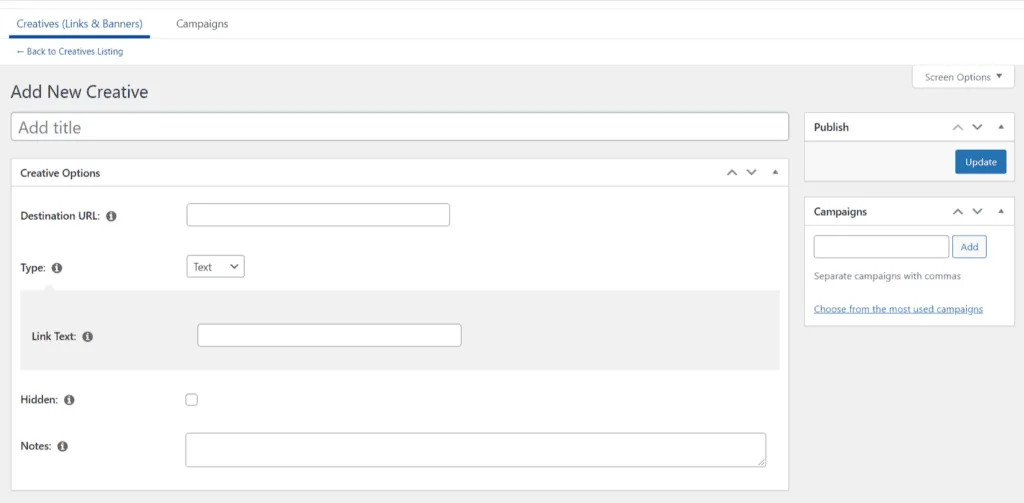
To begin creating a link or banner for your affiliates, first, go to your WordPress website’s back end, and navigate to Easy Affiliate > Creatives. Then click the Add New button:

If you're creating a simple link, start by entering your Destination URL. This is the page on your website that guests will be redirected to — such as a landing page or a product sales page — after they click on this link from one of your affiliates.
Next, you'll want to make sure that the Type of creative is set to Text, which it will be by Easy Affiliate default. The Link Text area is where you will type in the text that will link to your Destination URL. Once you’re done, click Update at the top right corner of the page, under Publish.
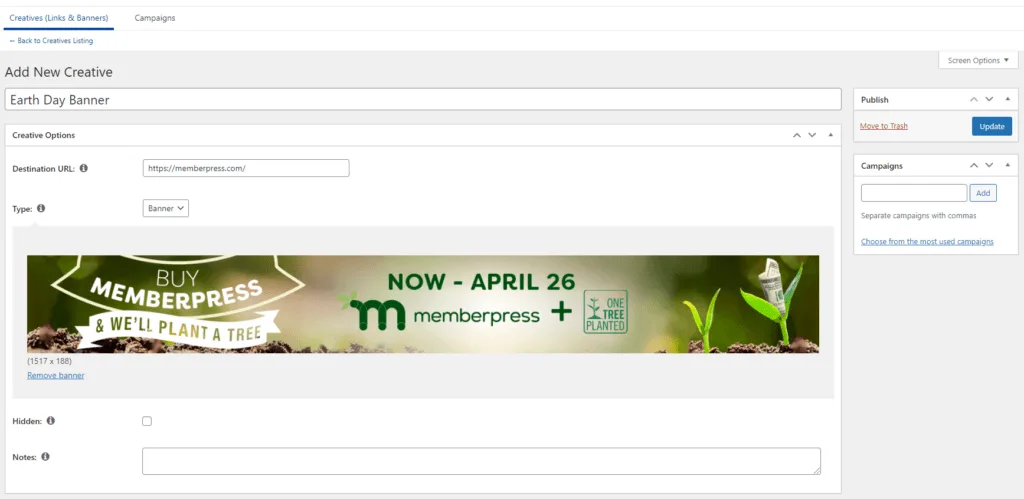
If you’re creating a banner, once again, you'll need to enter your Destination URL. But now you'll need to switch the default Type simply by clicking the drop down arrow and selecting the Banner option.
Now you can upload your banner’s image file by clicking the Set Banner text that appears in the gray drop down area section:

After you have uploaded your Banner ad, click the Update button.
Each time you create a new link and banner ad, they will be automatically added to your affiliates’ Dashboards:

Affiliate Dashboard view of created links and banner ads
Now your affiliates can easily locate their affiliate-specific links and ads to use across the web.
2 Additional Ways to Share Your Ads and Links With Your Affiliates
Even with the ads and links located on the Affiliate Dashboard, it’s still helpful to share them directly with your affiliates. We recommend two ways of doing so.
1. Add Them to a Affiliate Resource Hub

A resource hub is a place affiliates can go to find information. This includes how-to guides and even ads and links for your team to use. By adding these to your hub, you make it easy for affiliates to locate them. Here are two tips to get you started:
- Create a directory list of affiliates, including personalized links. You can do this for free with Google Sheets, then share the link to the document in your hub.
- Provide a generic link and detailed instructions. Since the personalized links follow a specific format, show your affiliates how they can turn any link into their own.
With the ads and links included in the resource hub, you now have a place on your affiliate site where all important tools are located. This will enable your affiliates to do their jobs successfully.
2. Include Them In an Affiliate Welcome Email

When affiliates are accepted to your program, it’s a good idea to send them a welcome email. This email should contain important information, including ads and links they can begin to use right away. Here are two effective ways for adding them:
- Include the ads and links URLs with the login credentials. This will ensure your affiliates see the URLs quickly.
- Link out to your affiliate directory. If you created an affiliate directory as mentioned above, you can provide the link to your directory document within the email.
By providing even your newest affiliates with their own ads and links, you empower them to begin work right away. This is great for them and your program!
Conclusion
Creating personalized ads and links URLs for each affiliate is important. However, doing this individually can take lots of time and cause major frustration. Fortunately, it’s possible to create these URLs within Easy Affiliate, and with very little required effort.
In this post, we’ve introduced you to Easy Affiliate’s Links and Banners feature and how to create your own. We've also shared a few extra ways you can be sure to connect your affiliates with your created advertising materials.
Do you have any questions about ads and links, or how you can create them efficiently in Easy Affiliate? Let us know in the comments section below!
If you liked this post, be sure to follow us on Twitter, Facebook, and LinkedIn! And don't forget to subscribe in the box below.


Leave a Reply